
Guest tutorial by: Sarah
Hey there, fellow sewists! I’m Sarah and like many of us, I learned to sew via the internet and have been hooked ever since. I work with Sewing Parts Online to provide free sewing articles and free Presser Feet Video Tutorials for the sewing community. We provide a wide range of sewing products, accessories, machine parts and deliver them to your front door. I hope you enjoy the tutorial and please come visit us or check us out on Facebook. Happy Sewing!
What I love most about creating your own wall art is the ability to play around and see what comes out. It’s an entirely original and personal creation you can hang with pride. I decided to mount mine on a canvas frame, but you can put it in a picture frame or just hang it as is. I chose to create something, which for me, was soothing and relaxing. Yours can be anything you like. Even if you just want to display a single pane of fabric, if you like it, then do it. You can have a lot of fun with embroidery or beads or buttons. You can add flowers or yarn, anything you can think of. Let loose and have fun!

Supplies
- 1 yard of fabric
- Basting spray
- Batting
- Decorative / Embroidery thread
- Topstitch needle
- Buttons
- Appliqué (I cut these dragon fly embroideries from some clearance home decor fabric to use as my appliqué)
- Optional embellishments: sequins, beads, feathers, flowers, etc.
- Staple Gun
- 4 individual wooden frames. You can find these at Michaels in the canvas section. Basically, you will make your own canvas. However, you can buy an already made canvas if you want.
Step 1
Determine which fabric you want for the background. Mine was originally striped, but I was in an experimental mood, so I cut it into a bunch of different sized squares. Then, I sewed the squares together piece by piece, seeing what fits where and rearranging to achieve my desired look. Many of my pieces had to be layered, which took a loooot of time. If you’re short on time or value your sanity, stick with a printed background or, if you want something pieced, try a checkered pattern.
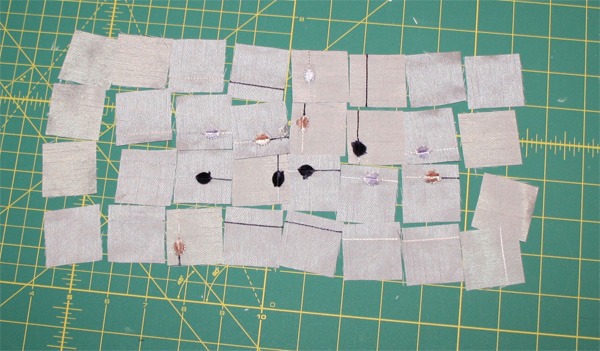 Go back and trim up any uneven edges, you just need to leave a 1 ½ border. You will need this to wrap around canvas frame.
 Step 2
Use basting spray to apply your batting and add in any quilting you want. I went back and zig zagged over some my stitches with metallic thread just for fun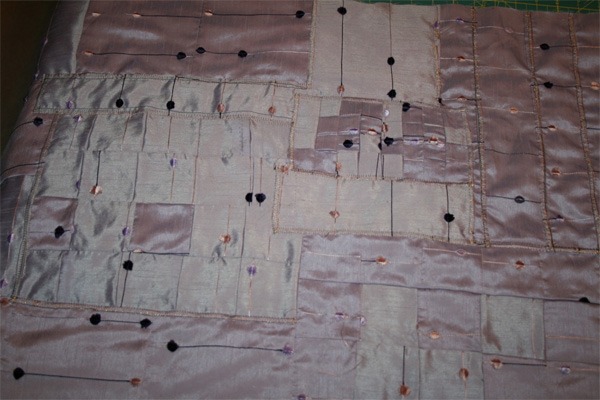 Step 3
Time to add some appliqué. I found this white sheer fabric in the remnant section and absolutely loved the embroider dragonflies on it. I cut a circle around the dragonflies and pinned them to the fabric. I used a narrow zigzag stitch, embroidery thread, and stitched along the white outline of the dragon fly. This was time consuming, but still fun. I used my standard zigzag foot and sewed slowly until I got the hang of the shape.
Once it’s sewn, carefully cut as close to the stitches as you can without cutting them. I highly recommend embroidery scissors. The curved blade makes it easy to get it closely. Step 4
Sew your buttons on in a pattern that is pleasing to your eye. You can also add in any other embellishments you like.
Step 5
Measure the dimensions of your finished piece. Take that measurement and subtract 1 ½ inches from each side to get your canvas size. You can find individual canvas wood pieces at Michaels to fit your project. If the measurement don’t match exactly to the frames at Michaels, choose the next size smaller. The corners slide together to make a frame.
Stretch your new wall art across the frame and staple in place with a staple gun.
2 thoughts on “How To Create Patchwork Wall Art”
You can make great applique out of it
Hey Sarah
Hey just what I was looking for is how to create patchwork wall art! Thanks so much for posting. You’re absolutely right!!! Thanks for writing this article.